Desserts
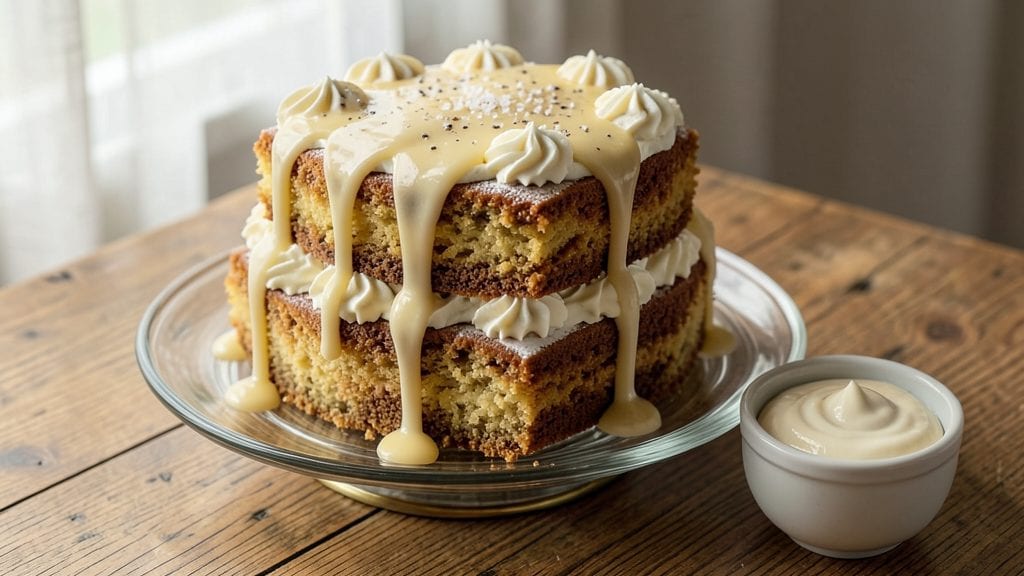
This classic vanilla butter cake recipe delivers the timeless combination of tender crumb and velvety buttermilk sauce that’s been a dessert staple for generations.
The secret lies in properly creamed butter and buttermilk, which create a moist, rich cake with a delicate crumb structure that holds up perfectly under the smooth, tangy sauce. I’ve perfected this method over years of baking, ensuring every slice is moist, flavorful, and just sweet enough.
The cake itself is a foolproof vanilla butter cake that requires no special skills—just precise measuring and gentle folding to maintain that signature tender texture. Meanwhile, the buttermilk sauce adds a cool, creamy contrast that balances the cake’s richness, making each bite a harmonious blend of textures and flavors.
This pairing is what transforms a simple cake into a showstopping dessert worthy of any occasion.
What sets this recipe apart is how the sauce elevates the cake—its tangy, velvety drizzle cuts through the sweetness while adding a luxurious finish. The cake bakes to a golden, even tone, while the sauce stays silky smooth, ready to be drizzled or layered between slices.
Together, they create a dessert that’s both comforting and impressive, perfect for celebrations or a cozy night in.
Ready in just under 2 hours (including cooling and sauce preparation), this recipe delivers restaurant-quality results without the fuss. Whether you’re serving it at a gathering or treating yourself, the combination of classic cake and buttermilk sauce is a timeless dessert that never goes out of style. Let’s get started!
Ingredients for classic vanilla butter cake with buttermilk sauce
Classic vanilla butter cake relies on precise ingredients for that signature tender crumb and velvety sauce.
| Ingredient | Amount | Notes |
|---|---|---|
| Unsalted Butter 🧈 | 1 cup | Cold, cut into cubes for creaming |
| Granulated White Sugar 🍚 | 2 cups | Superfine preferred for even texture |
| Large Eggs 🥚 | 4 whole | Room temperature for even mixing |
| All-Purpose Flour 🌾 | 2 ½ cups | Sifted, spooned for accuracy |
| Baking Powder 🍞 | 2 tsp | Aluminum-free for tender crumb |
| Diamond Crystal Kosher Salt 🧂 | ½ tsp | Fine grain for even distribution |
| Pure Vanilla Extract 🌸 | 2 tsp | Bourbon-based for depth of flavor |
| Buttermilk 🥛 | 1 ½ cups | Fresh, not powdered |
| Heavy Whipping Cream 🥛 | 1 cup | Cold, full-fat for sauce |
| Powdered Sugar 🍚 | 1 ½ cups | Confectioners, sifted |
| Lemon Juice 🍋 | 2 tbsp | Freshly squeezed |
| Vanilla Bean Paste 🌸 | 1 tbsp | For authentic vanilla flavor |
The unsalted butter is non-negotiable—it must be cold and cut into uniform cubes for proper creaming. Land O'Lakes or Plugrá brands excel for their high fat content, which ensures a moist crumb. For the sugar, superfine dissolves more evenly, but regular granulated works if sifted. The buttermilk should be fresh; if using powdered, reconstitute with cold milk to mimic tang. Eggs at room temperature blend seamlessly, avoiding lumps. King Arthur flour is ideal for its protein balance, but any all-purpose will suffice if measured accurately. The vanilla extract should be bourbon-based for depth—imitation extracts lack complexity.
No buttermilk? Mix 1 cup milk with 1 tbsp vinegar or lemon juice and let sit for 5 minutes. Substitute heavy cream with whipped cream cheese mixed with milk for the sauce, though texture may vary slightly. The vanilla bean paste can be swapped for 1 extra tsp pure extract, but the seeds add a luxurious quality. For the powdered sugar, Domino brand is finely sifted and ideal, but any confectioners' sugar works if sifted before use. The lemon juice should be freshly squeezed—bottled lacks brightness. If sifting flour feels tedious, use a fine-mesh sieve or whisk vigorously to aerate.
Store cake layers in an airtight container with parchment between them for up to 3 days at room temperature or 1 week refrigerated. The sauce keeps 5 days refrigerated or 3 months frozen in an airtight container. For assembly, let cake layers cool completely to prevent sogginess. The sauce can be reheated gently in the microwave or stovetop with a splash of milk to restore silkiness. Assemble the cake 24 hours ahead for flavors to meld perfectly.
Why You'll Love This Recipe
- No-Fuss Mixing: I swear by the creamy butter-fat ratio here—just three minutes of beating butter and sugar until it’s light and fluffy, then fold in the dry ingredients. No food processor, no stress, just a sturdy spoon and a bowl.
- Buttermilk Magic: That tangy, velvety sauce? It’s the star. The buttermilk in the batter keeps it moist, while the warm buttermilk sauce poured over the top—just simmered with a splash of vanilla—turns it from good to "I’ll have seconds" good.
- Weeknight Hero: Slice it for breakfast with coffee, pack it for lunch, or serve it at dinner with ice cream. The cake’s neutral base lets you dress it up (or down) without extra effort—no fancy ingredients, just pure, reliable comfort.
- Budget Win: Butter, sugar, flour—these are pantry staples you already own. A single batch yields six servings, and leftovers keep for days (yes, even the sauce stays rich when reheated). My wallet and my taste buds both approve.
Step-by-step instructions for classic vanilla butter cake with buttermilk sauce
Mastering this timeless cake relies on precise technique and patience—every step builds the signature tender crumb and velvety sauce.
Cream Butter and Sugar to Light Ribbons
In a stand mixer fitted with the paddle attachment, beat the 1 cup unsalted butter (cold, cubed) and 2 cups granulated white sugar on medium speed for 4-5 minutes. You're aiming for a pale, fluffy texture that nearly doubles in volume—this incorporates air for a light crumb. Stop occasionally to scrape down the bowl to ensure even mixing.
I press the paddle against the bowl sides to check consistency: when it leaves clean streaks that hold their shape for 5 seconds, it's ready. This stage is critical—under-creaming results in dense cake, while over-creaming adds gluten. The butter should be smooth but still hold its shape when pressed between fingers.
Incorporate Eggs and Dry Ingredients
Add the 4 whole large eggs (room temperature) one at a time, mixing on low speed for 30 seconds after each addition. This gradual incorporation prevents curdling. After the last egg, add the 2 teaspoons pure vanilla extract and 1 tablespoon vanilla bean paste, mixing for 30 seconds to fully integrate.
In a separate bowl, whisk together the 2.5 cups all-purpose flour, 2 teaspoons baking powder, and 0.5 teaspoon diamond crystal kosher salt. Sift the dry ingredients directly into the wet mixture and mix on low speed for 20-25 seconds until just combined—you should still see small flour streaks. Overmixing develops gluten, which makes the cake tough. The batter will be thick and slightly lumpy, which is perfect.
Alternate Wet and Dry Ingredients for Even Moisture
With the mixer running on low speed, add 1 cup of the 1.5 cups buttermilk in three equal pours, mixing just until incorporated after each addition. This alternating method ensures even moisture distribution without overdeveloping the gluten. After the last addition, mix for an additional 15 seconds to create a smooth, thick batter.
Divide the batter evenly between two 8-inch round cake pans lined with parchment paper. Tap the pans firmly on the counter 3 times to remove air bubbles. Bake in a preheated 350°F oven for 25-30 minutes, or until a toothpick inserted in the center emerges clean. The edges should be golden brown, and the top should spring back when pressed gently.
Prepare the Buttermilk Sauce
While the cakes cool, combine the remaining 0.5 cups buttermilk, 1 cup heavy whipping cream, 1.5 cups powdered sugar, 2 tablespoons lemon juice, and 1 teaspoon pure vanilla extract in a saucepan. Heat over medium-low heat, stirring constantly with a silicone spatula, until the mixture reaches 160°F—this ensures the sugar dissolves completely without curdling.
Strain the sauce through a fine-mesh sieve into a clean bowl to remove any lumps. Let it cool to room temperature, stirring occasionally. The sauce should thicken slightly as it cools, achieving a smooth, pourable consistency. This buttermilk base creates the signature tangy sweetness that complements the cake's richness.
Assemble and Serve
Level the cooled cakes if necessary, then place one layer on a serving plate. Spread half of the buttermilk sauce evenly over the top, reserving a small amount for garnish. Place the second cake layer on top and spread the remaining sauce over the cake. Drizzle the reserved sauce artistically over the top for presentation.
Serve immediately for the best texture contrast—warm cake with cool, creamy sauce. The cake should have a moist, tender crumb with a slight crunch on the edges, while the sauce adds a velvety finish. For an elevated touch, dust with powdered sugar or garnish with fresh berries. This classic combination delivers the perfect balance of richness and acidity in every bite.
Pro Tips For Making Classic Vanilla Butter Cake With Buttermilk Sauce
- Cream Butter Slowly: DESCRIPTION:
- Measure Flour Right: DESCRIPTION:
- Don’t Overmix the Batter: DESCRIPTION:
- Test for Doneness Early: DESCRIPTION:
Storing and reheating this dish
Room Temperature Storage
Keep your assembled cake at room temperature for up to 3 days in an airtight container with parchment paper between layers. The buttermilk sauce will thicken slightly but remains stable.
I place a small plate on top of the cake to maintain its shape while preventing the sauce from absorbing into the cake. Store in a cool, dry place away from direct sunlight to preserve moisture and texture. 🌡️
Refrigerator Preservation
For longer storage, refrigerate the cake and sauce separately. Wrap each cake layer individually in plastic wrap and place in an airtight container for up to 1 week. The sauce should be stored in a separate glass jar or airtight container and will keep for 5 days.
Refrigeration slows moisture loss, ensuring the cake stays tender and the sauce remains velvety. Always bring the cake to room temperature before serving for the best texture contrast. ❄️
Freezing for Later
Freeze the cake layers separately, wrapped tightly in plastic wrap followed by aluminum foil. They’ll keep for up to 3 months in a freezer-safe bag with excess air removed.
For the sauce, pour it into a freezer-safe container or ice cube tray for portion control—each cube equals 1 tbsp of sauce. Thaw the cake overnight in the fridge and bring the sauce to room temperature before assembling. This method preserves both components perfectly. ❄️
Reheating the Sauce
If the sauce thickens too much after refrigeration, gently reheat it in a saucepan over low heat with 1-2 tbsp milk or cream until smooth. Avoid boiling, as this can cause curdling.
For quick reheating, microwave in 20-second intervals, stirring between each, until it reaches 160°F. The sauce should be silky and pourable—never fully reheated to boiling. 🔥
Reviving the Cake
If your cake dries out slightly after storage, brush the layers with a simple sugar syrup (equal parts water and sugar, heated until dissolved) before adding the sauce. This restores moisture without altering flavor.
For a quick fix, slice the cake and warm it in the oven at 300°F for 5-7 minutes to revive its texture. Always assemble the cake just before serving to maintain that perfect contrast between warm cake and cool sauce. 💫
Nutrition facts
Frequently asked questions
Why does this recipe use buttermilk in both the cake and sauce?
The buttermilk in the cake creates a tender, moist crumb by reacting with the baking powder for lift, while its acidity balances the sweetness. In the sauce, it adds a subtle tang that cuts through the richness, making each bite more dynamic. The dual use ensures harmony between layers without overpowering flavors.
Can I substitute regular milk for buttermilk in the cake?
Yes, but you’ll need to recreate buttermilk’s tang. Mix 1 cup milk with 1 tbsp lemon juice or vinegar, let sit for 5 minutes, then use as directed. This mimics buttermilk’s acidity, though the texture may be slightly less tender. For the sauce, use heavy cream mixed with a splash of milk to maintain consistency.
How do I prevent my cake layers from cracking?
Cracking usually happens from overmixing or uneven baking. Mix dry ingredients just until combined (no flour streaks visible) and avoid overfilling pans—fill 2/3 full. Tap pans firmly on the counter 3 times before baking to release air bubbles. Bake at 350°F until a toothpick comes out clean, then cool completely before assembling.
Is this cake gluten-free?
No, this recipe requires all-purpose flour for its protein balance, which creates the signature tender crumb. For a gluten-free version, substitute with a 1:1 gluten-free flour blend (like Bob’s Red Mill) and add 1 extra tsp xanthan gum. Note that texture may vary slightly—expect a denser crumb.
Can I make this cake in a single layer instead of two?
Use one 9-inch round pan or a 9x13-inch pan** for a sheet cake. Reduce baking time by 5-7 minutes (check at 22-25 minutes for doneness). For a single layer, halve the sauce recipe or serve it on the side. The cake’s flavor and texture remain the same—just adjust portion sizes accordingly.